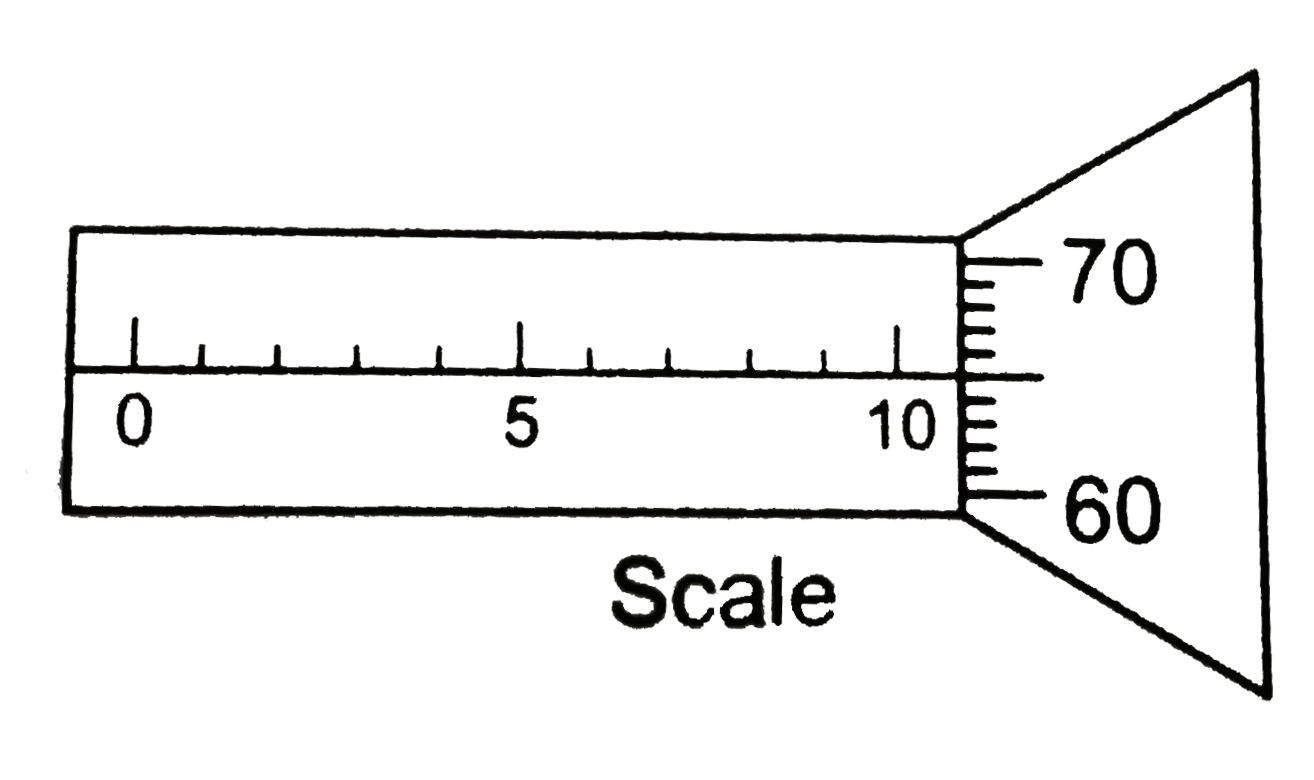
Two measure diameter of a wire a screw-gauge is used The main scale division is of 1mm In a complete rotation the screw advances by 1mm and the circular scale has 100 divisions The reading of screw-gauge is as shown in If there is no error is no error in mass measurement but error in length measurement is 1% then find max Possible error in density if diameter is 3.07 mm.
To solve the problem, we need to find the maximum possible error in density given the diameter of the wire and the percentage error in length measurement.
1. Identify the Given Values:
- Diameter of the wire, D=3.07mm
- Percentage error in length measurement, ΔLL×100=1%
- Main scale division (MSD) = 1mm
- Total advancement of screw in one complete rotation = 1mm
- Circular scale divisions = 100
2. Calculate the Least Count of the Screw Gauge:
Least Count=PitchNumber of divisions=1mm100=0.01mm
This means the smallest measurement that can be read on the screw gauge is 0.01mm.
3. Calculate the Error in Diameter Measurement:
- The error in diameter measurement, ΔD=Least Count=0.01mm
4. Use the Formula for Density:
The density ρ is given by:
ρ=mV=mπ4D2L
where V is the volume of the wire.
5. Calculate the Percentage Error in Density:
The formula for the percentage error in density is:
Δρρ×100=Δmm+2ΔDD+ΔLL
Since there is no error in mass measurement, Δm=0, so:
Δρρ×100=2ΔDD+ΔLL×100
6. Substituting the Values:
- Calculate ΔDD:
ΔDD=0.013.07
- Calculate ΔLL:
ΔLL=1100=0.01
7. Putting it All Together:
Δρρ×100=2(0.013.07)+1
=2×0.00326+1=0.00652+0.01=0.01652
=1.65%
Conclusion:
The maximum possible error in density is approximately 1.65%.
- Diameter of the wire, D=3.07mm
- Percentage error in length measurement, ΔLL×100=1%
- Main scale division (MSD) = 1mm
- Total advancement of screw in one complete rotation = 1mm
- Circular scale divisions = 100
Least Count=PitchNumber of divisions=1mm100=0.01mm
This means the smallest measurement that can be read on the screw gauge is 0.01mm.
- The error in diameter measurement, ΔD=Least Count=0.01mm
The density ρ is given by:
ρ=mV=mπ4D2L
where V is the volume of the wire.
The formula for the percentage error in density is:
Δρρ×100=Δmm+2ΔDD+ΔLL
Since there is no error in mass measurement, Δm=0, so:
Δρρ×100=2ΔDD+ΔLL×100
- Calculate ΔDD:
ΔDD=0.013.07
- Calculate ΔLL:
ΔLL=1100=0.01
Δρρ×100=2(0.013.07)+1
=2×0.00326+1=0.00652+0.01=0.01652
=1.65%
The maximum possible error in density is approximately 1.65%.
Topper's Solved these Questions
- EXPERIMENTAL PHYSICSBOOK - RESONANCE ENGLISHCHAPTER - EXPERIMENTAL PHYSICSEXERCISE - Exercise
12 Videos
- EXPERIMENTAL PHYSICSBOOK - RESONANCE ENGLISHCHAPTER - EXPERIMENTAL PHYSICSEXERCISE - Exercise -1 PART
1 Videos
- ELECTROSTATICSBOOK - RESONANCE ENGLISHCHAPTER - ELECTROSTATICSEXERCISE - HLP
40 Videos
- GEOMATRICAL OPTICS BOOK - RESONANCE ENGLISHCHAPTER - GEOMATRICAL OPTICS EXERCISE - Advance level Problems
35 Videos
Similar Questions
Find the thickness of the wire The main scale division is of 1mm In a complete rotation the screw advances by 1mm and the circular scale has 100 devisions

View SolutionRead the screwgaug shown bellow Main scale has 12mm marks In complete rotation the screw advances by (1)/(2)mm Circular scale has 50 division .
View Solution
Knowledge Check
The error in the measurement of the radius of a sphere is 1%. The error in the measurement of volume is
A0.01B0.03C0.05D0.08
Read the screw gauge shown below in the figure.
Given that circular scale has 100 divisions and in one complete rotation the screw advances by 1mm.
 .
.
View SolutionThe pitch of a screw gauge is 0.5 mm. It's head scale contains 50 divisions. The least count of the screw gauge is
View SolutionScrew gauge is said to have a negative error.
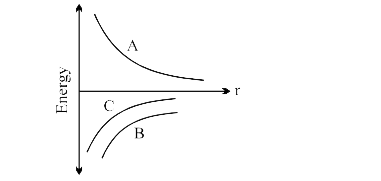
View SolutionThe figure shows the variation of energy with the orbit radius of a body in circular planetary motion.

Find the correct statement about the curves A, B and C
View SolutionIn a screw gauge, 5 complete rotations of circular scale give 1.5 mm reading on pitch scale. Consider circular scale has 50 divisions. Least count of the screw gauge is
View SolutionA screw gauge advances by 3mm in 6 rotations. There are 50 divisions on circular scale. Find least count of screw gauge
View SolutionA screw gauge advances by 3mm in 6 rotations. There are 50 divisions on circular scale. Find least count of screw gauge
View Solution
