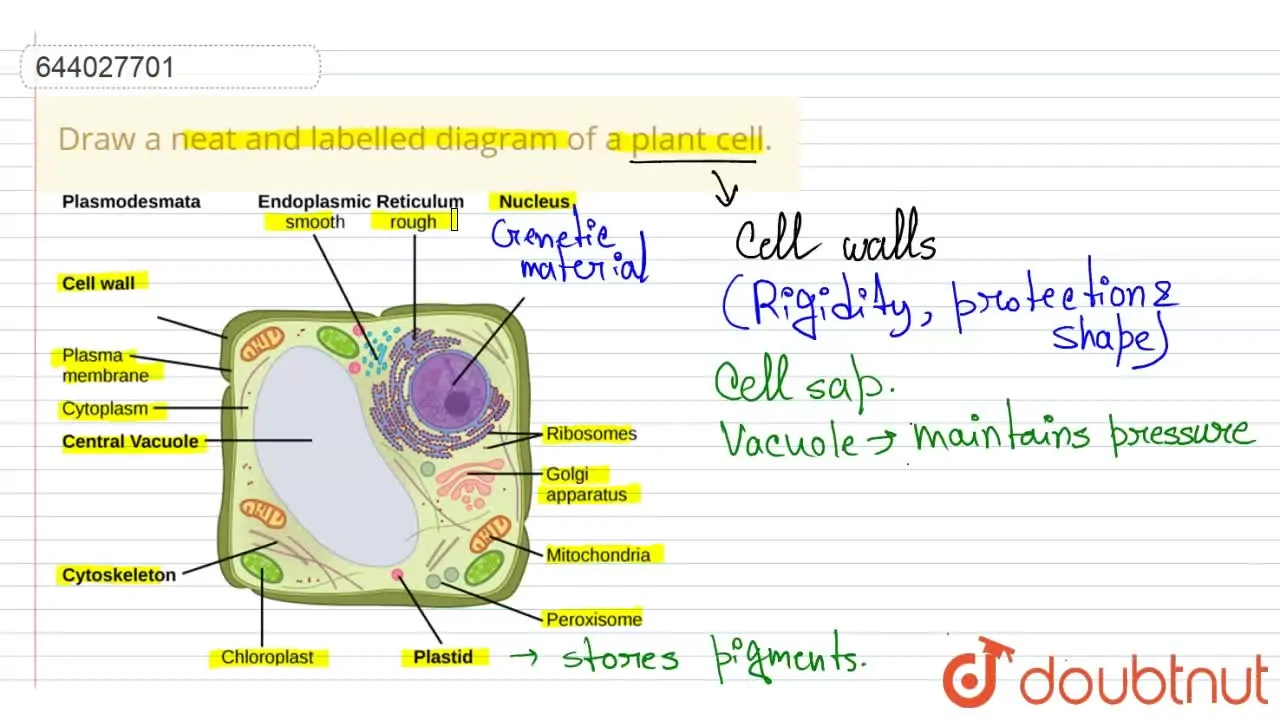
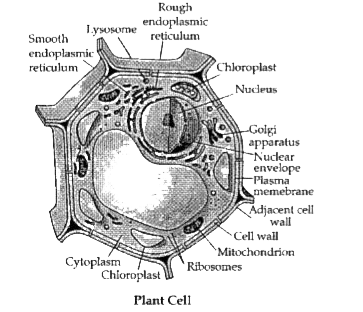
Draw a neat and labelled diagram of a plant cell.
Step-by-Step Solution to Draw a Neat and Labelled Diagram of a Plant Cell
1. Draw the Outline of the Plant Cell:
- Start by drawing a rectangular shape to represent the plant cell. This shape should be slightly larger than a typical animal cell to accommodate the larger vacuole.
Hint: Remember that plant cells usually have a more defined shape due to the presence of a cell wall.
2. Add the Cell Wall:
- Draw a thicker line around the rectangular shape to represent the cell wall. This wall provides rigidity and protection.
Hint: The cell wall is located outside the plasma membrane and is essential for maintaining the cell's shape.
3. Draw the Plasma Membrane:
- Inside the cell wall, draw another line to represent the plasma membrane. This membrane controls the movement of substances in and out of the cell.
Hint: The plasma membrane is thinner than the cell wall and is essential for cellular functions.
4. Include the Cytoplasm:
- Shade the area between the plasma membrane and the nucleus lightly to represent the cytoplasm, where various organelles are suspended.
Hint: Cytoplasm is the jelly-like substance that fills the cell and is where most cellular processes occur.
5. Draw the Central Vacuole:
- Draw a large oval shape in the center of the cell to represent the central vacuole. This vacuole is typically much larger in plant cells than in animal cells.
Hint: The central vacuole stores cell sap and helps maintain turgor pressure against the cell wall.
6. Add Organelles:
- Draw and label the following organelles:
- Nucleus: A round shape inside the cytoplasm, representing the control center of the cell.
- Chloroplasts: Small oval shapes with stacks inside them, representing the site of photosynthesis.
- Mitochondria: Bean-shaped structures with a squiggly line inside, representing the powerhouse of the cell.
- Endoplasmic Reticulum (ER): Draw rough (with dots for ribosomes) and smooth ER (without dots) as folded membranes near the nucleus.
- Golgi Apparatus: A series of stacked membranes, representing the packaging and distribution center.
- Ribosomes: Tiny dots scattered in the cytoplasm and on the rough ER.
- Cytoskeleton: Draw thin lines to represent the microtubules and filaments.
Hint: Each organelle has a specific function, so ensure they are appropriately placed in the cytoplasm.
7. Label Each Part:
- Clearly label each part of the cell with lines pointing to the respective organelles and structures. Use clear and legible handwriting.
Hint: Make sure the labels are not cluttered and are easy to read.
Final Diagram
- Ensure that the diagram is neat, with all parts accurately represented and labeled.
- Start by drawing a rectangular shape to represent the plant cell. This shape should be slightly larger than a typical animal cell to accommodate the larger vacuole.
- Draw a thicker line around the rectangular shape to represent the cell wall. This wall provides rigidity and protection.
- Inside the cell wall, draw another line to represent the plasma membrane. This membrane controls the movement of substances in and out of the cell.
- Shade the area between the plasma membrane and the nucleus lightly to represent the cytoplasm, where various organelles are suspended.
- Draw a large oval shape in the center of the cell to represent the central vacuole. This vacuole is typically much larger in plant cells than in animal cells.
- Draw and label the following organelles:
- Nucleus: A round shape inside the cytoplasm, representing the control center of the cell.
- Chloroplasts: Small oval shapes with stacks inside them, representing the site of photosynthesis.
- Mitochondria: Bean-shaped structures with a squiggly line inside, representing the powerhouse of the cell.
- Endoplasmic Reticulum (ER): Draw rough (with dots for ribosomes) and smooth ER (without dots) as folded membranes near the nucleus.
- Golgi Apparatus: A series of stacked membranes, representing the packaging and distribution center.
- Ribosomes: Tiny dots scattered in the cytoplasm and on the rough ER.
- Cytoskeleton: Draw thin lines to represent the microtubules and filaments.
- Clearly label each part of the cell with lines pointing to the respective organelles and structures. Use clear and legible handwriting.
- Ensure that the diagram is neat, with all parts accurately represented and labeled.
Topper's Solved these Questions
- CELL:THE UNIT OF LIFE BOOK - ICSECHAPTER - CELL:THE UNIT OF LIFE EXERCISE - TOPIC 3(3 Mark Questions )
2 Videos
- CELL: THE UNIT OF LIFEBOOK - ICSECHAPTER - CELL: THE UNIT OF LIFEEXERCISE - REVIEW QUESTIONS (E. STRUCTURED/APPLICATION/SKILL TYPE)
3 Videos
- DIGESTIVE SYSTEM BOOK - ICSECHAPTER - DIGESTIVE SYSTEM EXERCISE - PROGRESS CHECK
42 Videos
Similar Questions
Draw a neat and labelled diagram of a tooth.
View SolutionDraw a neat and labelled diagram of a neuron.
View SolutionDraw a neat labelled diagram of an animal cell.
View SolutionDraw a neat and labelled diagram of an electric bell and describe its working.
View SolutionDraw a neat and labelled diagram of a mature anatropous ovule before fertilisation.
View SolutionDraw a neat and labelled diagram of a multipolar neuron and write two differences between an axon and dendron.
View SolutionDraw a neat labelled diagram of a biogas plant.
View SolutionDraw a neat and labelled diagram of the chloroplast.
View SolutionDraw a labelled diagram of a nerve cell.
View SolutionDraw a neat and labelled diagram of a screw gauge. Name its main parts and state their functions.
View Solution