UNIT AND MEASUREMENTS for Class 11 PHYSICS
INTRODUCTION
Physical quantities ko measure ya compare karne ke liye hume measurement ke process ki jarurat hoti hai. Is process me hum he ek standard quantities ko measure krne ke liye certain unit choose krte hai jo worldwide accepted hoti hai. Is chapter me hum sare physical quantities ko kaise measure krte hai aur unke kya-kya units decided hai, iske regarding study karenge.
PHYSICAL QUANTITY
Is topic me hum physical quantities aur unke units ke bare me padhenge. Aisi quantities jinko hum measure kr sakte hai unhe physical quantities kehte hai. A Quantity that can be measured is called Physical Quantity. Length, Mass, Velocity, Temperature, Area, Volume, Density etc are physical quantities kyunki inhe measure kr sakte hai. Kya aisi quantities bhi hoti hai jinko hum measure nahi kr sakte? Haa, aisi quantities hoti hai. Inhe non physical quantities kehte hai. For example, jab hume bhook lagti hai to hum hunger measure nahi kr sakte hai. Iska koi exact measure nahi hota hai. Building, bus, room, road etc ye sare non physical quantities hai.
Physical quantities ko teen categories me divide kr sakte hai.
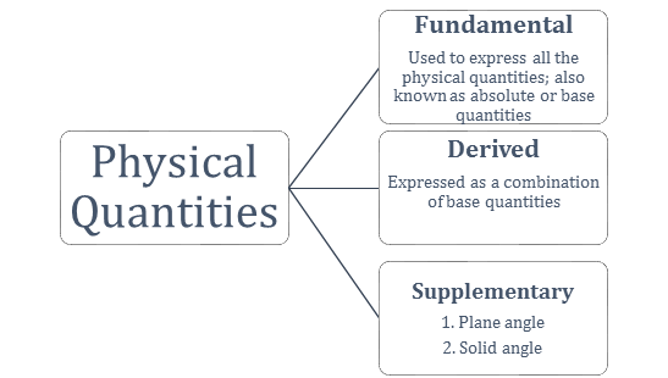
1. Fundamental Quantity: A physical quantity which does not depend on any other physical quantity for its measurement.
2. Derived Quantity: The physical quantities which are expressed in terms of more than one fundamental quantity.
3. Supplementary Quantity: Supplementary units are those that aren't yet graded as either base or derived. Beside the seven fundamental physical quantities two supplementary quantities are also defined, they are : (1) Plane angle (2) Solid angle.
Fundamental Quantity
Ab hum Fundamental Quantities ko samjhte hai.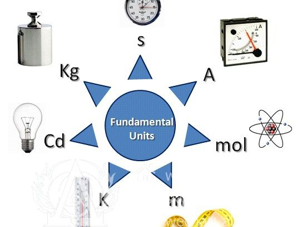
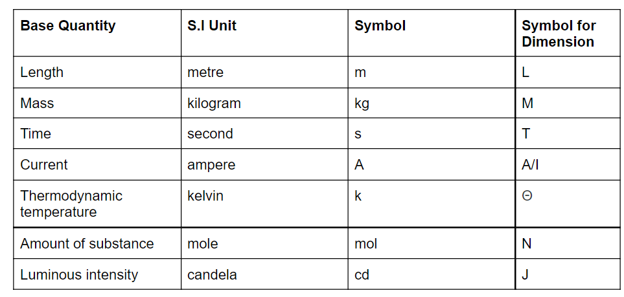
Niche table me jo 7 fundamental quantities hai jo aapko yaad rakhna hai.
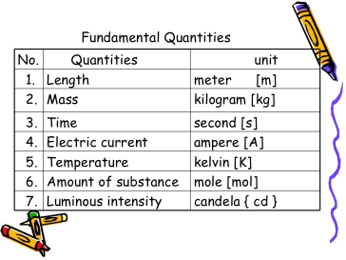
In sare fundamental quantities me se Luminous intensity aapke liye new hai. It is Measure of intensity or brightness of Light. Ye hame ye batata hai ki light kitna bright ya intense hai.
Note: Fundamental quantities are also called absolute or base quantities. In mechanics, we treat length, mass and time as the three basic or fundamental quantities.
Two Supplementary Quantities:
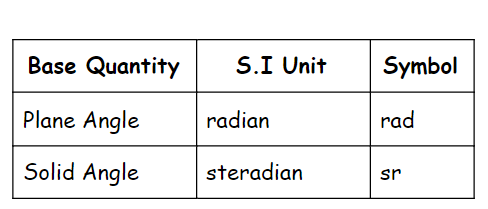
Solid angle: Angle inscribed by surface at point is called solid angle.
Note: The supplementary quantities have only units but no dimensions.
Derived Quantities
For example : Speed, velocity, acceleration, force, momentum, pressure, energy etc.Velocity (ms)⇒displacementtime
Acceleration (ms2)⇒ velocity/time
Work (kg−m2s2)
or joule ⇒force×displacement
Pressure (kgm−1s−2)⇒forcearea
Ye derived quantities various quantities se derive hote hai aur ultimately, ye measure ya express fundamental quantities ke terms me hote hai. Example: Work ka units (kgm2s2) hai. Kg mass ka unit hai, m length ka unit hai aur s time ka unit hai. Mass, length aur time fundamental quantities hai.
MAGNITUDE
Magnitude of physical quantity = (numerical value) × (unit)Physical quantity ka magnitude hamesha constant hota hai. Ye unit ke type pr depend nahi karta hai.
⇒numerical value∝1unit
or n1u1=n2u2 = constant
STANDARD UNITS
Unit of a physical quantity is a standard used for the measurement of that physical quantity.Example: Do points ke bich ka distance kuchh kilometres me hota hai. Hum distance ko kilometre me measure krte hai. Ye standard reference hai jo hum distance measure krne me follow krte hai.
Hum temperature ko degree Celsius ya Farenheit me measure krte hai so ye unit hai. Sare physical quantities jab measure hote hai to wo standard references ke terms me describe hote hai jisse unit kehte hai.
Ye standard reference system to system ya place to place vary krte hai.
Depending upon which system of units are being followed, the measurement or value of a physical quantity may change.
SYSTEM OF UNITS
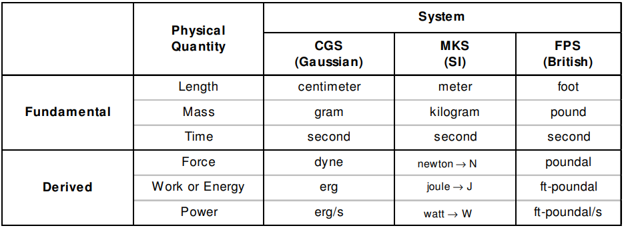
A set or collection of Fundamental and Derived Unit is called a system of unit.System of units CGS, MKS ya S.I ho sakta hai. Ab hum inke bare me ek ek krke study krenge.
C.G.S system of unit me, length ko centimetres me, mass ko grams ke terms me aur time ko seconds ke terms me measure krte hai.
Jab hum grams, centimetres ya seconds ke terms me baat krte hai to iska matlab hum C.G.S system of units ke terms me baat karte hai.
Velocity, jo derived quantity hai, C.G.S me wo cms−1 hai.
C.G.S systems across the globe commonly follow hota hai.
M.K.S system of unit me, length ko metres me, mass ko kilogram me aur time ko seconds ke terms me measure krte hai. Pehle ke time me ye system bahut km places me follow hota tha.
Britishers F.P.S system of unit follow krte the. Isme, length ko foot me, mass ko pound me aur time ko seconds ke terms me measure krte the. Generally aapne WWE ya wretlings me padha hoga ki humans ke mass pounds me hote hai.
Har place ke log apna apna system of units follow krte the isliye sare system of units ko unify kiya gya. Ye unification role International System of Units (S.I units) ne kiya.
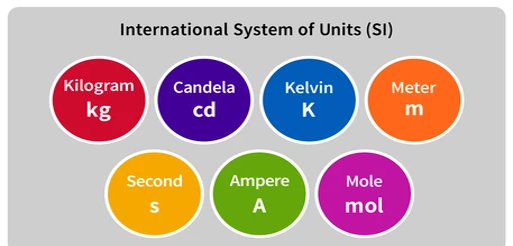
S.I Unit me, length metre, mass kilogram, time second, temperature kelvin, amount of substance mole, aur current ampere ke terms me measure hote hai. Ab har jagah ye S.I system of units follow hota hai.
Definitions of some important SI Units
(i) Metre : 1 m = 1,650, 763.73 wavelengths in vacuum, of radiation corresponding to organ-red light of krypton-86.(ii) Second : 1 s = 9,192, 631,770 time periods of a particular from Cesium - 133 atoms. (iii) Kilogram : 1kg = mass of 1 litre volume of water at 4°C.
(iv) Ampere : It is the current which when flows through two infinitely long straight conductors of negligible cross-section placed at a distance of one metre in vacuum produces a force of 2 ×10⁻⁷N/m between them.
(v) Kelvin : 1 K = 1/273.16 part of the thermodynamic temperature of the triple point of water.
(vi) Mole : It is the amount of substance of a system which contains as many elementary particles (atoms, molecules, ions etc.) as there are atoms in 12g of carbon - 12.
(vii) Candela : It is luminous intensity in a perpendicular direction of a surface of (1600000)m2 of a black body at the temperature of freezing point under a pressure of 1.013×10⁵N/m2 .
(viii) Radian : It is the plane angle between two radii of a circle which cut-off on the circumference, an arc equal in length to the radius.
(ix) Steradian : The steradian is the solid angle which, having its vertex at the centre of the sphere, cut-off an area of the surface of the sphere equal to that of a square with sides of length equal to the radius of the sphere.
S.I. PREFIXES

Characteristics of base units or standards :
(A) Well defined (B) Accessibility (C) Invariability (D) Convenience in use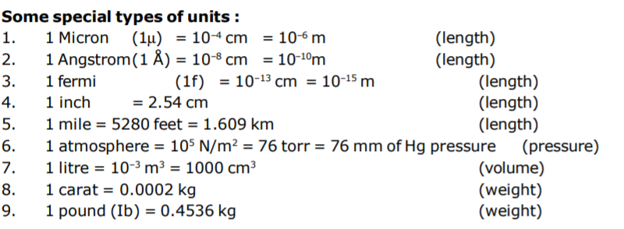
PHYSICAL QUANTITY
Is topic me hum physical quantities aur unke units ke bare me padhenge. Aisi quantities jinko hum measure kr sakte hai unhe physical quantities kehte hai. A Quantity that can be measured is called Physical Quantity. Length, Mass, Velocity, Temperature, Area, Volume, Density etc are physical quantities kyunki inhe measure kr sakte hai. Kya aisi quantities bhi hoti hai jinko hum measure nahi kr sakte? Haa, aisi quantities hoti hai. Inhe non physical quantities kehte hai. For example, jab hume bhook lagti hai to hum hunger measure nahi kr sakte hai. Iska koi exact measure nahi hota hai. Building, bus, room, road etc ye sare non physical quantities hai.
Physical quantities ko teen categories me divide kr sakte hai.

1. Fundamental Quantity: A physical quantity which does not depend on any other physical quantity for its measurement.
2. Derived Quantity: The physical quantities which are expressed in terms of more than one fundamental quantity.
3. Supplementary Quantity: Supplementary units are those that aren't yet graded as either base or derived. Beside the seven fundamental physical quantities two supplementary quantities are also defined, they are : (1) Plane angle (2) Solid angle.
Fundamental Quantity
Ab hum Fundamental Quantities ko samjhte hai.
Niche table me jo 7 fundamental quantities hai jo aapko yaad rakhna hai.

In sare fundamental quantities me se Luminous intensity aapke liye new hai. It is Measure of intensity or brightness of Light. Ye hame ye batata hai ki light kitna bright ya intense hai.
Note: Fundamental quantities are also called absolute or base quantities. In mechanics, we treat length, mass and time as the three basic or fundamental quantities.
Two Supplementary Quantities:

Solid angle: Angle inscribed by surface at point is called solid angle.
Note: The supplementary quantities have only units but no dimensions.
Derived Quantities
For example : Speed, velocity, acceleration, force, momentum, pressure, energy etc.Velocity (ms)⇒displacementtime
Acceleration (ms2)⇒ velocity/time
Work (kg−m2s2)
or joule ⇒force×displacement
Pressure (kgm−1s−2)⇒forcearea
Ye derived quantities various quantities se derive hote hai aur ultimately, ye measure ya express fundamental quantities ke terms me hote hai. Example: Work ka units (kgm2s2) hai. Kg mass ka unit hai, m length ka unit hai aur s time ka unit hai. Mass, length aur time fundamental quantities hai.
MAGNITUDE
Magnitude of physical quantity = (numerical value) × (unit)Physical quantity ka magnitude hamesha constant hota hai. Ye unit ke type pr depend nahi karta hai.
⇒numerical value∝1unit
or n1u1=n2u2 = constant
STANDARD UNITS
Unit of a physical quantity is a standard used for the measurement of that physical quantity.Example: Do points ke bich ka distance kuchh kilometres me hota hai. Hum distance ko kilometre me measure krte hai. Ye standard reference hai jo hum distance measure krne me follow krte hai.
Hum temperature ko degree Celsius ya Farenheit me measure krte hai so ye unit hai. Sare physical quantities jab measure hote hai to wo standard references ke terms me describe hote hai jisse unit kehte hai.
Ye standard reference system to system ya place to place vary krte hai.
Depending upon which system of units are being followed, the measurement or value of a physical quantity may change.
SYSTEM OF UNITS
A set or collection of Fundamental and Derived Unit is called a system of unit.System of units CGS, MKS ya S.I ho sakta hai. Ab hum inke bare me ek ek krke study krenge.
C.G.S system of unit me, length ko centimetres me, mass ko grams ke terms me aur time ko seconds ke terms me measure krte hai.
Jab hum grams, centimetres ya seconds ke terms me baat krte hai to iska matlab hum C.G.S system of units ke terms me baat karte hai.
Velocity, jo derived quantity hai, C.G.S me wo cms−1 hai.
C.G.S systems across the globe commonly follow hota hai.
M.K.S system of unit me, length ko metres me, mass ko kilogram me aur time ko seconds ke terms me measure krte hai. Pehle ke time me ye system bahut km places me follow hota tha.
Britishers F.P.S system of unit follow krte the. Isme, length ko foot me, mass ko pound me aur time ko seconds ke terms me measure krte the. Generally aapne WWE ya wretlings me padha hoga ki humans ke mass pounds me hote hai.

Har place ke log apna apna system of units follow krte the isliye sare system of units ko unify kiya gya. Ye unification role International System of Units (S.I units) ne kiya.
S.I Unit me, length metre, mass kilogram, time second, temperature kelvin, amount of substance mole, aur current ampere ke terms me measure hote hai. Ab har jagah ye S.I system of units follow hota hai.

Definitions of some important SI Units
(i) Metre : 1 m = 1,650, 763.73 wavelengths in vacuum, of radiation corresponding to organ-red light of krypton-86.(ii) Second : 1 s = 9,192, 631,770 time periods of a particular from Cesium - 133 atoms. (iii) Kilogram : 1kg = mass of 1 litre volume of water at 4°C.
(iv) Ampere : It is the current which when flows through two infinitely long straight conductors of negligible cross-section placed at a distance of one metre in vacuum produces a force of 2 ×10⁻⁷N/m between them.
(v) Kelvin : 1 K = 1/273.16 part of the thermodynamic temperature of the triple point of water.
(vi) Mole : It is the amount of substance of a system which contains as many elementary particles (atoms, molecules, ions etc.) as there are atoms in 12g of carbon - 12.
(vii) Candela : It is luminous intensity in a perpendicular direction of a surface of (1600000)m2 of a black body at the temperature of freezing point under a pressure of 1.013×10⁵N/m2 .
(viii) Radian : It is the plane angle between two radii of a circle which cut-off on the circumference, an arc equal in length to the radius.
(ix) Steradian : The steradian is the solid angle which, having its vertex at the centre of the sphere, cut-off an area of the surface of the sphere equal to that of a square with sides of length equal to the radius of the sphere.
S.I. PREFIXES

Characteristics of base units or standards :
(A) Well defined (B) Accessibility (C) Invariability (D) Convenience in use
EXAMPLE 1
Classify the quantities displacement, mass, force, time, speed, velocity, acceleration, moment of intertia, pressure and work under the following catagories:
(a) base and scalar (b) base and vector (c) derived and scalar (d) derived and vector
(a) mass, time
(b) displacement
(c ) speed, pressure, work
(d) force, velocity, acceleration
EXAMPLE 2
The acceleration due to gravity is 9.8ms−2. Give its value in ft s−2
As 1m = 3.2 ft
∴ 9.8m/s2=9.8×3.28ft/s2=32.14ft/s2≈32ft/s2
EXAMPLE 2
The acceleration due to gravity is 9.8ms−2. Give its value in ft s−2
As 1m = 3.2 ft
∴ 9.8m/s2=9.8×3.28ft/s2=32.14ft/s2≈32ft/s2
EXAMPLE 3
Convert 1 newton (SI unit of force) into dyne (CGS unit of force)
The dimensional equation of forces is [F]=[M1L1T−2]
Therefore if n1,u1andn2,u2 corresponds to SI & CGS units respectively, then
n2=n1[M1M2]1[L1L2]1[T1T2]2=1[kgg][mcm][ss]−2=1×1000×100×1=105 ∴1 newton = 105 dyne.
EXAMPLE 3
Convert 1 newton (SI unit of force) into dyne (CGS unit of force)
The dimensional equation of forces is [F]=[M1L1T−2]
Therefore if n1,u1andn2,u2 corresponds to SI & CGS units respectively, then
n2=n1[M1M2]1[L1L2]1[T1T2]2=1[kgg][mcm][ss]−2=1×1000×100×1=105 ∴1 newton = 105 dyne.
EXAMPLE 4
It is known that the time of revolution T of a satellite around the earth depends on the universal gravitational constant G, the mass of the earth M, and the radius of the circular orbit R. Obtain an expression for T using dimensional analysis.
We have [T]∝[G]a[M]b[R]c
⇒[M]a[L]0[T]1=[M]−a[L]3a[T]−2a×[M]b×[L]c=[M]b−a[L](c+3a)[T]−2a
Comparing the exponents
For [T]: 1=−2a⇒a=−12 For [M]: 0=b−a⇒b−a=−12
For [L]: 0=c+3a⇒c=−3a=32
Putting the values we get T∝G−1/2M−1/2R3/2⇒T∝√R3GM
The actual expression is T =2π√R3GM
DIMENSIONAL ANALYSIS
Dimensional analysis various physical quantities ko samjhne ka bahut important aur special method hai. Basically ye hame ye batata hai ki kaise physical quantities various fundamental quantities pr dependent hote hai. Kisi bhi physical quantity ka dimension uske base quantity pr dependence express krta hai. For example, Length ke measurement ka dimension L ya L1 hota hai, mass ke measurement ka dimension M ya M1 hota hai aur time ke measurement ka dimension T ya T1.
Units ke jaise hi, dimensions bhi rules of algebra ko follow krte hai.
Aapke examinations me ye method mcqs solve karne me bahut useful hai. Out of 30 questions in exam, 3 to 4 questions directly solve ho sakta hai ager dimensional analysis strong hai. So, ab hum samjhte hai dimensional analysis ka kya matlab hota hai.
Dimension: Power to which fundamental quantity must be raised in order to obtain the unit of the given quantity.
Dimensional Formula: It is an expression which shows how and which of the fundamental units are required to represent the unit of physical quantity.
Jab koi dimension express krte hai to square brackets [ ] ke ander express krte hai.
Dimensions of Fundamental Quantities:
Dimensions of Length - [M0L1T0]Dimensions of Mass -[M1L0T0]
Dimensions of Time - [M0L0T1]
Dimensions of Temperature - [M0L0T0K1A0]
Dimensions of Current - [M0L0T0K0A1]
Dimensions of Luminous Intensity - C
Dimensions of Amount of Substance - mol
Dimensions of Derived Quantities:
Dimensions of SpeedStep 1: Speed ka dimensions find karne ke liye sabse pehle hame formula likhna hoga.
Speed = Distance/Time
Step 2: Distance ka dimensions [M0L1T0] hai aur time ka dimensions [M0L0T1] hai.
Speed = [M0L1T0]/[M0L0T1]
Step 3: Speed = [M0L1T−1]
Dimensions of Temperature Gradient
Step 1: Temp. Gradient = Temperature/ Distance
Step 2: Temp. Gradient = [M0L0T0K1]/ [M0L1T0K0]
Step 3: Temp. Gradient = [M0L−1T0K1]
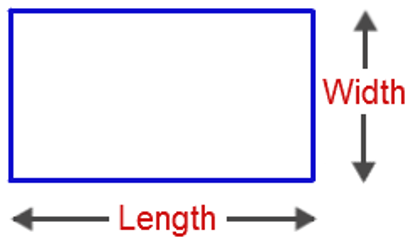
Dimensions of Area
Area = Length× width
S.I unit =m×m
=m2
Dimensions of Area = [M0L2T0]
Dimensions of Volume
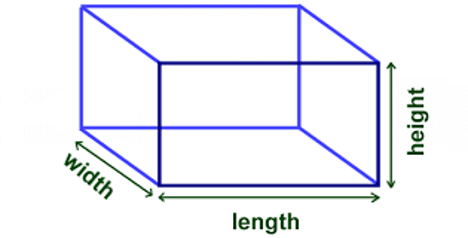
Volume = Length × width × height
S.I unit =m×m×m
=m3
Dimensions of Volume: [M0L3T0]
Dimensions of Density
Density (ρ) = Mass/Volume
Dimensions of Mass =[M1L0T0]
Dimensions of Volume =[M0L3T0]
Dimensions of Density =M1L0T0M0L3T0
Dimensions of Density =[M1L−3T0]
Dimensions of Momentum
Momentum (p) = mass × velocity
Dimensions of Mass =[M1L0T0]
Dimensions of Velocity = Distance/time
=M0L1T0M0L0T1
=[M0L1T−1]
Dimensions of Momentum =[M1L0T0]×c
Dimensions of Momentum =[M1L1T−1]
Dimensions of Force
Force = Mass × acceleration
=m×a
Dimensions of Mass =[M1L0T0]
Dimensions of Acceleration, a=v2−v1t
=M0L1T−1M0L0T1
=[M0L1T−2]
Dimensions of Force =[M1L0T0]×[M0L1T−2]
Dimensions of Force =[M1L1T−2]
Dimensions of Universal Constant of Gravitation
Formula for gravitational force,
F=Gm1m2r2
G=Fr2m1m2
Where G→ universal constant of gravitation
M1,m2→ Masses
r→ Distance between the two masses
Dimensions of Force =[M1L1T−2]
Dimensions of Length =[M0L1T0]
Dimensions of r2=[M0L2T0]
Dimensions of Mass =[M1L0T0]
Dimensions of G=[M1L1T−2]M0L2T0M2L0T0
Dimensions of G=M1L3T−2M2L0T0
Dimensions of G=[M−1L3T−2]
Dimensions of Impulse
Formula for Impulse =F×t
Dimensions of Impulse =[M1L1T−1]
Dimensions of Work
Formula for work =F×d
Dimensions of Work =[M1L2T−2]
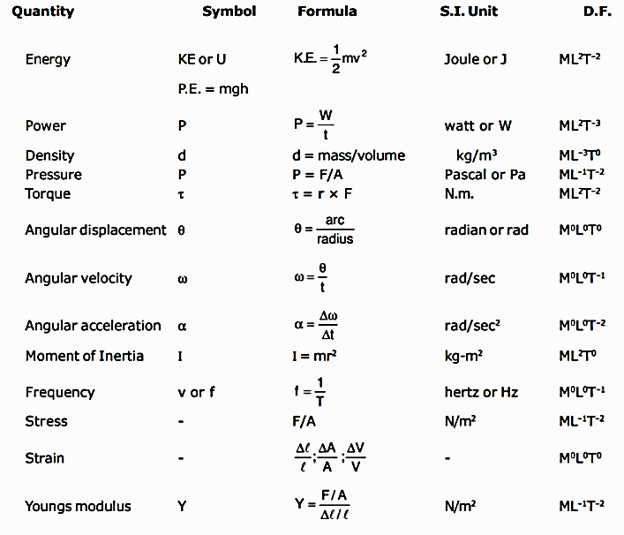
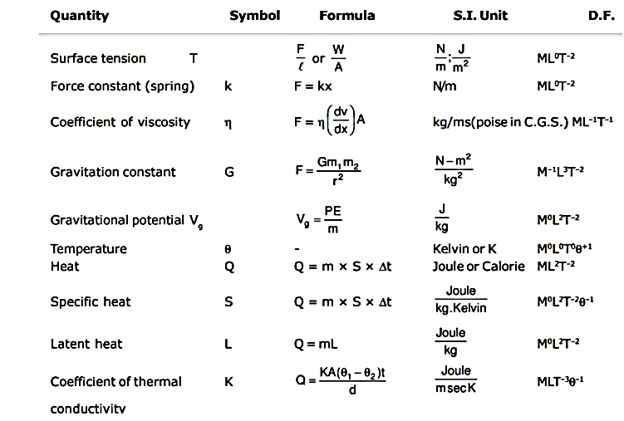
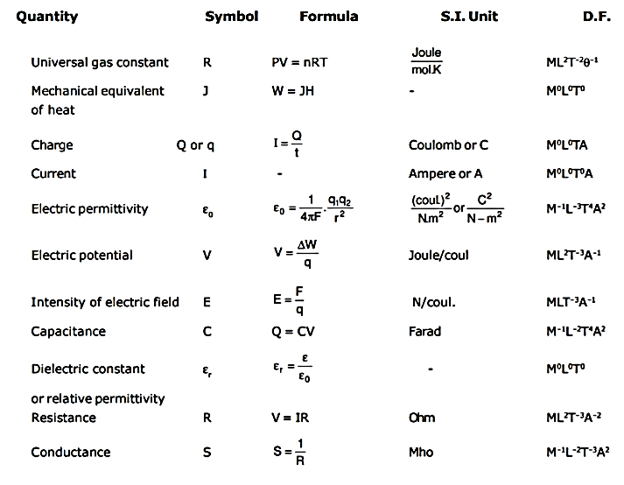
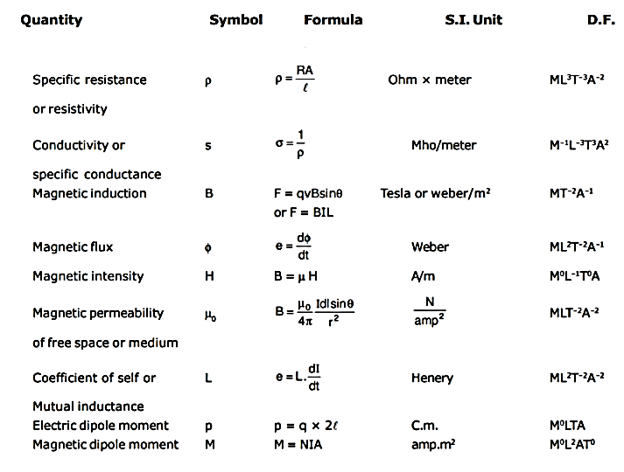
Different quantities with units. symbol and dimensional formula.
USES OF DIMENSIONAL ANALYSIS
Theory of dimensions ke main uses hai:-1. Conversion of units.
This is based on the fact that the product of the numerical value (n) and its corresponding unit (u) is a constant.
Suppose ek physical quantity ka dimensions mass me a, length me b aur time me c hai. Ager fundamental units ek system me M1 , L1 aur T1 hai aur dusre system me M2 , L2 aur T2 respectively hai to hum likh sakte hai:
n1[Ma1Lb1Tc1]=n2[Ma2Lb2Tc2]
Example: Find conversion factor between S.I unit and C.G.S unit of force. S.unit of Force is Newton
C.G.S unit of Force is dyne
Let 1 Newton =x dyne
Dimensions of Force =[M1L1T−2]
Equation in dimensional form;
1[M11L11T−21]=x[M12L12T−22]
x=M11L11T−21M12L12T−22
=[M1M2]1[L1L2]1[T1T2]−2
In S.I system, L→m,M→kg,T→s
In C.G.S system, L→cm,M→g,T→s
x=[mcm]1[kgg]1[ss]−2
x=[102cmcm]1[103gg]1(1)−2
x=105
1 Newton = 105 dyne
2. To check the dimensional correctness of a given physical equation.
Har physical equation dimensionally balanced hona chahiye. Isse 'Principle of Homogeneity' kehte hai. The dimensions of each term on both sides of an equation must be the same. Is basis pr hum judge kr sakte hai ki given equation sahi hai ya nahi. Ek dimensionally correct equation physically correct ya incorrect ho sakta hai.
3. Principle of Homogeneity of Dimensions.
This principle states that the dimensions of all the terms in a physical expression should be same. Example, physical expression, s=ut+12at2 me, s, ut aur 12at2 sare ke dimensions same hai.
Note: The physical quantities separated by the symbols +, –, =, >, < etc., have the same dimensions.
4. To establish the relation among various physical quantities.
Ager hume pata hai ki given physical quantities kaun kaun se factors pr depend krti hai then we can find a formula relating the quantity with those factors. Let us take an example.
Example: To establish the relation P=hρg
Where P→ Hydrostatic Pressure, h→ Height of liquid volume, ρ→ density, g→ acceleration due to gravity
Let us assume that,
P=khxρygz
Dimensions of P=[M1L−1T−2]
Dimensions of h=[M0L1T0]
Dimensions of ρ=[M1L−3T0]
Dimensions of g=[M0L1T−2]
Equation becomes,
[M1L−1T−2]=k[M0L1T0]x[M1L−3T0]y[M0L1T−2]z
[M1L−1T−2]=k[MyLx−3y+zT−2z]
Comparing L.H.S and R.H.S,
x−3y+z=−1⇒y=1
−2z=−2⇒z=1
x=1
Substituting these values,
P=kh1ρ1g1
Here, k = 1
Note: Value of k which is a constant cannot be found using dimensional analysis.
5. Limitations of Dimensional Analysis.
The method of dimensions has the following limitations:
(i) Is method se dimensionless constant ka value calculate nahi ho sakta.
(ii) Is method se equation jinme trigonometrical, exponential aur logarithmic terms hote hai wo analyse nahi ho sakte.
(iii) Ager ek physical quantity 3 se jyada factors pr depend krta hai to unke bich ka relation establish nahi ho sakta kyunki sirf 3 equations ho sakte hai M, L aur T ke powers ko equalise karke.
DIMENSIONAL ANALYSIS
Dimensional analysis various physical quantities ko samjhne ka bahut important aur special method hai. Basically ye hame ye batata hai ki kaise physical quantities various fundamental quantities pr dependent hote hai. Kisi bhi physical quantity ka dimension uske base quantity pr dependence express krta hai. For example, Length ke measurement ka dimension L ya L1 hota hai, mass ke measurement ka dimension M ya M1 hota hai aur time ke measurement ka dimension T ya T1.
Units ke jaise hi, dimensions bhi rules of algebra ko follow krte hai.
Aapke examinations me ye method mcqs solve karne me bahut useful hai. Out of 30 questions in exam, 3 to 4 questions directly solve ho sakta hai ager dimensional analysis strong hai. So, ab hum samjhte hai dimensional analysis ka kya matlab hota hai.
Dimension: Power to which fundamental quantity must be raised in order to obtain the unit of the given quantity.
Dimensional Formula: It is an expression which shows how and which of the fundamental units are required to represent the unit of physical quantity.

Jab koi dimension express krte hai to square brackets [ ] ke ander express krte hai.
Dimensions of Fundamental Quantities:
Dimensions of Length - [M0L1T0]Dimensions of Mass -[M1L0T0]
Dimensions of Time - [M0L0T1]
Dimensions of Temperature - [M0L0T0K1A0]
Dimensions of Current - [M0L0T0K0A1]
Dimensions of Luminous Intensity - C
Dimensions of Amount of Substance - mol
Dimensions of Derived Quantities:
Dimensions of SpeedStep 1: Speed ka dimensions find karne ke liye sabse pehle hame formula likhna hoga.
Speed = Distance/Time
Step 2: Distance ka dimensions [M0L1T0] hai aur time ka dimensions [M0L0T1] hai.
Speed = [M0L1T0]/[M0L0T1]
Step 3: Speed = [M0L1T−1]
Dimensions of Temperature Gradient
Step 1: Temp. Gradient = Temperature/ Distance
Step 2: Temp. Gradient = [M0L0T0K1]/ [M0L1T0K0]
Step 3: Temp. Gradient = [M0L−1T0K1]
Dimensions of Area
Area = Length× width
S.I unit =m×m
=m2
Dimensions of Area = [M0L2T0]

Dimensions of Volume
Volume = Length × width × height
S.I unit =m×m×m
=m3
Dimensions of Volume: [M0L3T0]

Dimensions of Density
Density (ρ) = Mass/Volume
Dimensions of Mass =[M1L0T0]
Dimensions of Volume =[M0L3T0]
Dimensions of Density =M1L0T0M0L3T0
Dimensions of Density =[M1L−3T0]
Dimensions of Momentum
Momentum (p) = mass × velocity
Dimensions of Mass =[M1L0T0]
Dimensions of Velocity = Distance/time
=M0L1T0M0L0T1
=[M0L1T−1]
Dimensions of Momentum =[M1L0T0]×c
Dimensions of Momentum =[M1L1T−1]
Dimensions of Force
Force = Mass × acceleration
=m×a
Dimensions of Mass =[M1L0T0]
Dimensions of Acceleration, a=v2−v1t
=M0L1T−1M0L0T1
=[M0L1T−2]
Dimensions of Force =[M1L0T0]×[M0L1T−2]
Dimensions of Force =[M1L1T−2]
Dimensions of Universal Constant of Gravitation
Formula for gravitational force,
F=Gm1m2r2
G=Fr2m1m2
Where G→ universal constant of gravitation
M1,m2→ Masses
r→ Distance between the two masses
Dimensions of Force =[M1L1T−2]
Dimensions of Length =[M0L1T0]
Dimensions of r2=[M0L2T0]
Dimensions of Mass =[M1L0T0]
Dimensions of G=[M1L1T−2]M0L2T0M2L0T0
Dimensions of G=M1L3T−2M2L0T0
Dimensions of G=[M−1L3T−2]
Dimensions of Impulse
Formula for Impulse =F×t
Dimensions of Impulse =[M1L1T−1]
Dimensions of Work
Formula for work =F×d
Dimensions of Work =[M1L2T−2]
Different quantities with units. symbol and dimensional formula.


USES OF DIMENSIONAL ANALYSIS
Theory of dimensions ke main uses hai:-1. Conversion of units.
This is based on the fact that the product of the numerical value (n) and its corresponding unit (u) is a constant.
Suppose ek physical quantity ka dimensions mass me a, length me b aur time me c hai. Ager fundamental units ek system me M1 , L1 aur T1 hai aur dusre system me M2 , L2 aur T2 respectively hai to hum likh sakte hai:
n1[Ma1Lb1Tc1]=n2[Ma2Lb2Tc2]
Example: Find conversion factor between S.I unit and C.G.S unit of force. S.unit of Force is Newton
C.G.S unit of Force is dyne
Let 1 Newton =x dyne
Dimensions of Force =[M1L1T−2]
Equation in dimensional form;
1[M11L11T−21]=x[M12L12T−22]
x=M11L11T−21M12L12T−22
=[M1M2]1[L1L2]1[T1T2]−2
In S.I system, L→m,M→kg,T→s
In C.G.S system, L→cm,M→g,T→s
x=[mcm]1[kgg]1[ss]−2
x=[102cmcm]1[103gg]1(1)−2
x=105
1 Newton = 105 dyne
2. To check the dimensional correctness of a given physical equation.
Har physical equation dimensionally balanced hona chahiye. Isse 'Principle of Homogeneity' kehte hai. The dimensions of each term on both sides of an equation must be the same. Is basis pr hum judge kr sakte hai ki given equation sahi hai ya nahi. Ek dimensionally correct equation physically correct ya incorrect ho sakta hai.
3. Principle of Homogeneity of Dimensions.
This principle states that the dimensions of all the terms in a physical expression should be same. Example, physical expression, s=ut+12at2 me, s, ut aur 12at2 sare ke dimensions same hai.
Note: The physical quantities separated by the symbols +, –, =, >, < etc., have the same dimensions.
4. To establish the relation among various physical quantities.
Ager hume pata hai ki given physical quantities kaun kaun se factors pr depend krti hai then we can find a formula relating the quantity with those factors. Let us take an example.
Example: To establish the relation P=hρg
Where P→ Hydrostatic Pressure, h→ Height of liquid volume, ρ→ density, g→ acceleration due to gravity
Let us assume that,
P=khxρygz
Dimensions of P=[M1L−1T−2]
Dimensions of h=[M0L1T0]
Dimensions of ρ=[M1L−3T0]
Dimensions of g=[M0L1T−2]
Equation becomes,
[M1L−1T−2]=k[M0L1T0]x[M1L−3T0]y[M0L1T−2]z
[M1L−1T−2]=k[MyLx−3y+zT−2z]
Comparing L.H.S and R.H.S,
x−3y+z=−1⇒y=1
−2z=−2⇒z=1
x=1
Substituting these values,
P=kh1ρ1g1
Here, k = 1
Note: Value of k which is a constant cannot be found using dimensional analysis.
5. Limitations of Dimensional Analysis.
The method of dimensions has the following limitations:
(i) Is method se dimensionless constant ka value calculate nahi ho sakta.
(ii) Is method se equation jinme trigonometrical, exponential aur logarithmic terms hote hai wo analyse nahi ho sakte.
(iii) Ager ek physical quantity 3 se jyada factors pr depend krta hai to unke bich ka relation establish nahi ho sakta kyunki sirf 3 equations ho sakte hai M, L aur T ke powers ko equalise karke.
EXAMPLE 5
EXAMPLE 5
EXAMPLE 6
The dimensional formula of electric potential is
Electric potential=WorkCharge<br≥[ML^2T^(−2)]/(AT)<br≥[ML^2T^(−3)A^(−1)]
EXAMPLE 6
The dimensional formula of electric potential is
Electric potential=WorkCharge<br≥[ML^2T^(−2)]/(AT)<br≥[ML^2T^(−3)A^(−1)]
EXAMPLE 7
When a wave transverses in a medium, the displacement of a particle located at distance x at time t is given by y=asin(bt−cx) where a, b and c are constants of the wave. The dimension of b/c are same as that of:
bt and cx are arguments of sine thus they are dimensionless
bt=M0L0T0 cx=M0L0T0
b=M0L0T−1 c=M0L−1T0
b/c=[T−1][L−1]=[LT−1]=v= wave velocity
EXAMPLE 8
Which of the following does not have the dimensior of force ?
Force =[M1L1T−2]
Weight = mg = [M][L1T−2]=[M1L1T−2]
Enery gradient =[M1L2T−2][L1]=[M1L1T−2]
Potential gradient = −dvdx
=[M1L2T−3A−1][L1]=[M1L1T−3A−1]
EXAMPLE 8
Which of the following does not have the dimensior of force ?
Force =[M1L1T−2]
Weight = mg = [M][L1T−2]=[M1L1T−2]
Enery gradient =[M1L2T−2][L1]=[M1L1T−2]
Potential gradient = −dvdx
=[M1L2T−3A−1][L1]=[M1L1T−3A−1]
SIGNIFICANT FIGURE
The significant figures (SF) in a measurement are the figures or digits that are known with certainty plus one that is uncertain. Significant figures in a measured value of a physical quantity tell the number of digits in which we have confidence. Larger the number of significant figures obtained in a measurement, greater is its accuracy and vice versa.
Appropriate number of significant data is important in order to have a meaningful level of power-resolution when reporting analytical concentrations. Various methods or parameters can be used to determine how many significant figures are required. In most cases, three key figures are sufficient.
The term “significant figures” refers to the number of important single digits (0 to 9 inclusive) in the coefficient of expression in the scientific notation. The number of significant figures in the expression indicates the confidence or precision with which an engineer or scientist indicates a quantity.
CONCISE RULES TO IDENTIFY SIGNIFICANT FIGURES
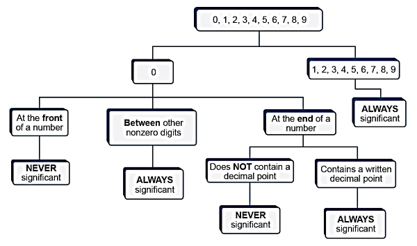
* Non-zero digits like 1, 2, 3, 4,... 9 ye sabhi significant hai.* Ager non-zero digits ke bich me zero ho to ye zero significant hai like 105, 3006, 34009. * Zero se start hone wale numbers like 0.04, 0003.977, 002.578, 005 isme leading zeros kabhi significant nahi hote.
* Aise numbers jisme decimal point ho aur in numbers ke end me zero ho like 3.02800, 2.500, 26.600 isme trailing zeros significant hai.
* Ager number me decimal point na ho aur in numbers ke end me zero ho like 3000, 5400, 230 isme trailing zeros significant ho bhi sakte hai aur nahi bhi kyon ki ye depend karta hai errors ke additional graphical symbols ya explicit information pr, significant figure clarify krne ke liye hume iski jarurat hoti hai. Like 13700 me 3 SF hai but 13700 mA me 5 SF hai.
NOTE:
To avoid the confusion regarding the trailing zeros of the numbers without the decimal point the best way is to report every measurement in scientific notation (in the power of 10). In this notation every number is expressed in the form a×10b , where a is the base number between 1 and 10 and b is any positive or negative exponent of 10. The base number (a) is written in decimal form with the decimal after the first digit. While counting the number of SF only base number is considered (Rule VI).
* The change in the unit of measurement of a quantity does not affect the number of SF.
For example in 2.308 cm = 23.08 mm = 0.02308 m each term has 4 SF.
ROUNDING OFF
To represent the result of any computation containing more than one uncertain digit, it is rounded off to an appropriate number of significant figures.Rules for rounding off the numbers :
• I Rule : If the digit to be rounded off is more than 5, then the preceding digit is increased by one. e.g. 6.87≈6.9• II Rule : If the digit to be rounded off is less than 5, then the preceding digit is unaffected and is left unchanged. e.g. 3.94≈3.9
• III Rule : If the digit to be rounded off is 5 then the preceding digit is increased by one if it is odd and is left unchanged if it is even. e.g. 14.35≈14.4 and 14.45≈14.4
Rules for arithmetical operations with significant figures
• Rule I : In addition or subtraction the number of decimal places in the result should be equal to the number of decimal places of that term in the operation which contain a lesser number of decimal places. e.g. 12.587 – 12.5 = 0.087 = 0.1 ( second term contain lesser i.e. one decimal place)• Rule II : In multiplication or division, the number of SF in the product or quotient is the same as the smallest number of SF in any of the factors. e.g. 5.0 × 0.125 = 0.625 = 0.62
Note : First carry out actual addition or subtraction then round off.
ORDER OF MAGNITUDE
Order of magnitude of a quantity is the power of 10 required to represent that quantity. This power is determined after rounding off the value of the quantity properly. For rounding off, the last digit is simply ignored if it is less than 5 and, is increased by one if it is 5 or more than 5.When a number is divided by 10x (where x is the order of the number) the result will always lie between 0.5 and 5, i.e. 0.5N/10x<5
Significant Figures Examples
The numbers in boldface are the significant figures.* 3205 – 4 significant figures
* 70.05 – 4 significant figures
* 740,000 – 2 significant figures
* 5.00 – 3 significant figures
* 0.00400 – 3 significant figures
SIGNIFICANT FIGURE
The significant figures (SF) in a measurement are the figures or digits that are known with certainty plus one that is uncertain. Significant figures in a measured value of a physical quantity tell the number of digits in which we have confidence. Larger the number of significant figures obtained in a measurement, greater is its accuracy and vice versa.
Appropriate number of significant data is important in order to have a meaningful level of power-resolution when reporting analytical concentrations. Various methods or parameters can be used to determine how many significant figures are required. In most cases, three key figures are sufficient.
The term “significant figures” refers to the number of important single digits (0 to 9 inclusive) in the coefficient of expression in the scientific notation. The number of significant figures in the expression indicates the confidence or precision with which an engineer or scientist indicates a quantity.
CONCISE RULES TO IDENTIFY SIGNIFICANT FIGURES
* Non-zero digits like 1, 2, 3, 4,... 9 ye sabhi significant hai.* Ager non-zero digits ke bich me zero ho to ye zero significant hai like 105, 3006, 34009. * Zero se start hone wale numbers like 0.04, 0003.977, 002.578, 005 isme leading zeros kabhi significant nahi hote.
* Aise numbers jisme decimal point ho aur in numbers ke end me zero ho like 3.02800, 2.500, 26.600 isme trailing zeros significant hai.
* Ager number me decimal point na ho aur in numbers ke end me zero ho like 3000, 5400, 230 isme trailing zeros significant ho bhi sakte hai aur nahi bhi kyon ki ye depend karta hai errors ke additional graphical symbols ya explicit information pr, significant figure clarify krne ke liye hume iski jarurat hoti hai. Like 13700 me 3 SF hai but 13700 mA me 5 SF hai.
NOTE:
To avoid the confusion regarding the trailing zeros of the numbers without the decimal point the best way is to report every measurement in scientific notation (in the power of 10). In this notation every number is expressed in the form a×10b , where a is the base number between 1 and 10 and b is any positive or negative exponent of 10. The base number (a) is written in decimal form with the decimal after the first digit. While counting the number of SF only base number is considered (Rule VI).
* The change in the unit of measurement of a quantity does not affect the number of SF.
For example in 2.308 cm = 23.08 mm = 0.02308 m each term has 4 SF.

ROUNDING OFF
To represent the result of any computation containing more than one uncertain digit, it is rounded off to an appropriate number of significant figures.Rules for rounding off the numbers :
• I Rule : If the digit to be rounded off is more than 5, then the preceding digit is increased by one. e.g. 6.87≈6.9• II Rule : If the digit to be rounded off is less than 5, then the preceding digit is unaffected and is left unchanged. e.g. 3.94≈3.9
• III Rule : If the digit to be rounded off is 5 then the preceding digit is increased by one if it is odd and is left unchanged if it is even. e.g. 14.35≈14.4 and 14.45≈14.4
Rules for arithmetical operations with significant figures
• Rule I : In addition or subtraction the number of decimal places in the result should be equal to the number of decimal places of that term in the operation which contain a lesser number of decimal places. e.g. 12.587 – 12.5 = 0.087 = 0.1 ( second term contain lesser i.e. one decimal place)• Rule II : In multiplication or division, the number of SF in the product or quotient is the same as the smallest number of SF in any of the factors. e.g. 5.0 × 0.125 = 0.625 = 0.62
Note : First carry out actual addition or subtraction then round off.
ORDER OF MAGNITUDE
Order of magnitude of a quantity is the power of 10 required to represent that quantity. This power is determined after rounding off the value of the quantity properly. For rounding off, the last digit is simply ignored if it is less than 5 and, is increased by one if it is 5 or more than 5.When a number is divided by 10x (where x is the order of the number) the result will always lie between 0.5 and 5, i.e. 0.5N/10x<5
Significant Figures Examples
The numbers in boldface are the significant figures.* 3205 – 4 significant figures
* 70.05 – 4 significant figures
* 740,000 – 2 significant figures
* 5.00 – 3 significant figures
* 0.00400 – 3 significant figures
EXAMPLE 9
Write the number of significant digits in the following
(a) 1001 (b)100.1 (c) 100.10 (d) 0.001001
(a)Number of significant digits = 4
(b) Number of significant digits = 4
(c) Number of significant digits = 5
(d) Number of significant digits = 4
EXAMPLE 9
Write the number of significant digits in the following
(a) 1001 (b)100.1 (c) 100.10 (d) 0.001001
(a)Number of significant digits = 4
(b) Number of significant digits = 4
(c) Number of significant digits = 5
(d) Number of significant digits = 4
EXAMPLE 10
Round the following numbers to 2 significant digits
(a)3472 (b)84.16 (c)2.55 (d)28.5
(a) After rounding off it will be 3500 because after digit 4 , 7 is present whose value is greater than 5 and the next two digits are neglected and the value of 4 is increased by 1.
(b)After rounding off it will be 84
(c)After rounding off it will be 2.6
(d)After rounding off it will be 28
EXAMPLE 11
Express the result of the following calculations to the appropriate number of significant digits.
6.66×3.33+216.67
6.66×3.33+216.67
22.18+216.67––––––––– 23885–––––––––
After rounding off the result is 238.
EXAMPLE 11
Express the result of the following calculations to the appropriate number of significant digits.
6.66×3.33+216.67
6.66×3.33+216.67
22.18+216.67––––––––– 23885–––––––––
After rounding off the result is 238.
EXAMPLE 12
Write down the number of significant figures in the following .
(A)8428 , (B)82.00 m , (C )0.828 cm , (D)8200 N
(A)Number of significant digits = 4
(B) Number of significant digits = 2
(C) Number of significant digits = 3
(D) Number of significant digits = 4
EXAMPLE 12
Write down the number of significant figures in the following .
(A)8428 , (B)82.00 m , (C )0.828 cm , (D)8200 N
(A)Number of significant digits = 4
(B) Number of significant digits = 2
(C) Number of significant digits = 3
(D) Number of significant digits = 4
EXAMPLE 13
Write down the number of significant figures in the following (a) 6428 (b)62.00 (c)0.00628 cm (d) 1200N
The number of significant figures in the given options are as follows :
(a) 6428 : It has 4 significant figures.
- Because all are non zero numbers.
(b) 62.00 : It has 4 significant figures.
- Because the zeros after decimal are significant.
(c) 0.00628 : It has 3 significant figures.
- Because the zeros between decimal and non-zero digits are not significant.
(d) 1200 : It has 2 significant figures.
- Because the zeros after non-zero digits are not significant.
ACCURACY AND ERRORS IN MEASUREMENTS
Aap jante hai Science is all about experiments, scientists aur people jo experiments conduct karte hai wo experiments se readings lete hai aur in readings me bahut sare errors ho sakte hai. Isliye particular reading me kya error ho sakta hai ye janna bahut important hai aur kaise ye error represent hoga taki sare scientists ke liye wo understood ho.
Error is the amount of uncertainty in measurement of the magnitude of a physical quantity.
Error = measured value - true value
Types of Errors
1. Instrumental errors: Ye errors faulty instruments ke use se occur hote hai.2. Systematic errors: Ye errors occur hote hai procedure me error ke karan ya instrument me miscalibration ke karan. In errors ke same size aur sign hote hai sare measurements me. Calculations shuru karne se pehle systematic error ko remove kiya jata hai. Bench error aur zero error systematic error ke examples hai.
3. Random errors: Ye randomly occur hote hai operators, external conditions me fluctuations ya measuring instruments me variability ke karan. Random error ke effect measured values ke average nikalkr reduce ho sakte hai. Random errors ke koi fixed sign ya size nahi hote hai. Thus they are represented in the form A±a.
4. Personal errors: Jo errors human senses, judgement, carelessness aur responses ke limitations ke karan occur hote hai unhe personal errors kehte hai.
Jab bhi koi experiment perform hota hai, measured quantity me do tarah ke errors appear ho sakte hai. (1) random and (2) systematic errors
Calculation of Errors
Most Probable Value: amean=a1+a2+......+ann=1nn∑a=1aiAbsolute Error: |Δa|=|amean−a|
Relative Error = absolute error/ most probable error =|amean−a|amean
Percentage Error = Relative error × 100 %
=|amean−a|amean×100%
Calculating Errors
1. Addition and subtraction rule: Absolute random errors add hote hai.Thus if R=A+B,r=a+b
and if R=A−B,r=a+b
2. Product and quotient rule: Relative random errors add hote hai.
Thus if R=AB,rR=aA+bB
and if R=AB, then also rR=aA+bB
3. Power rule: When a quantity Q is raised to a power P, the relative error in the result is P times the relative error in Q. Aisa negative powers ke liye bhi hota hai.
If R=PQ.rR=P×qQ
4. The quotient rule: Jab numerator aur denominator ek dusre pr dependent hote hai tab ye applicable nahi hota hai. E.g. If R=XYX+Y. Hum R me error find karne ke liye quotient rule apply nahi kr sakte hai. Hum equation aise likh sakte hai;
1R=1X+1Y.
Differentiating both the sides, we get;
−dRR2=−dXX2−dYY2
Thus, rR2=xX2+yY2
EXAMPLE 15
What is the fractional error in g calculated from T=2π√lg ? Given that fractional error in T and l are ±x and ±y respectively.
T=2π√lg⇒g=4π2lT2
Δgg=Δll+2ΔTT=y=2x
EXAMPLE 15
What is the fractional error in g calculated from T=2π√lg ? Given that fractional error in T and l are ±x and ±y respectively.
T=2π√lg⇒g=4π2lT2
Δgg=Δll+2ΔTT=y=2x
EXAMPLE 16
A physical quantity is given by X=MaLbTc. The percentage error in measurement of M,L and T are α,β and γ respectively. Then maximum percentage error in the quantity X is
ΔXX×100=aΔMM%+bΔLL%+cΔTT%
=aα%+bβ%+cγ%
ΔXX×100=(aα+bβ+cγ)%
EXAMPLE 16
A physical quantity is given by X=MaLbTc. The percentage error in measurement of M,L and T are α,β and γ respectively. Then maximum percentage error in the quantity X is
ΔXX×100=aΔMM%+bΔLL%+cΔTT%
=aα%+bβ%+cγ%
ΔXX×100=(aα+bβ+cγ)%
EXAMPLE 17
The error in measuring the side of a cube is ±1%. The error in the calculation of the volume of the cube will be about
Volume of cube V = (side)3
∴V=a3. Take log and differentiate.
ΔVV×100=3Δaa×100=3(±1%)=±3%
EXAMPLE 17
The error in measuring the side of a cube is ±1%. The error in the calculation of the volume of the cube will be about
Volume of cube V = (side)3
∴V=a3. Take log and differentiate.
ΔVV×100=3Δaa×100=3(±1%)=±3%
EXAMPLE 18
The pressure on a square plate is measured by measuring the force on the plate and the length of the sides of the plate . If the maximum error in the measurement of force and length are , respectively , 4%and2%. Find the maximum error in the measurement of pressure.
P=FA=FL2 For max. error
ΔPP×100=ΔFF×100+2ΔLL×100
=4%+2(2%)=8%
EXAMPLE 19
While measuring acceleration due to gravity by simpe pendulum a student makes a positive error of 1% in the length of the pendulum and a negative error of 3% in the value of the time period. His percentage error in the measurement of the value of g will be -
T=2π√lg⇒g=4π2lT2
Δgg×100=Δll×100+2ΔTT×100
=1%+2(3%)=7%
EXAMPLE 20
The resistance R of a wire is given by the relation R=ρlπr2. Percentage error in the measurement of ρ,landr is 1 % , 2% and 3% respectively. Then the percentage error in the measurement of R is
Resistance of a wire R=ρlρ×100+Δll×100+2Δrr×100
=1%+2%+2(3%)=9%
EXAMPLE 20
The resistance R of a wire is given by the relation R=ρlπr2. Percentage error in the measurement of ρ,landr is 1 % , 2% and 3% respectively. Then the percentage error in the measurement of R is
Resistance of a wire R=ρlρ×100+Δll×100+2Δrr×100
=1%+2%+2(3%)=9%
EXAMPLE 21
The resistance R=V/i, where V=100±5VandI=10±0.2A. What is the total error in R?
R=VI⇒ΔRR=ΔVV+ΔII
⇒ΔRR×100=(5100×100+0.210×100)=7%
EXAMPLE 21
The resistance R=V/i, where V=100±5VandI=10±0.2A. What is the total error in R?
R=VI⇒ΔRR=ΔVV+ΔII
⇒ΔRR×100=(5100×100+0.210×100)=7%
EXAMPLE 22
If error in measuring diameter of a circle is 4%, the error in circumference of the circle would be : -
Circumferences (S) = 2πr
ΔSS×100=Δrr×100=4%
EXAMPLE 22
If error in measuring diameter of a circle is 4%, the error in circumference of the circle would be : -
Circumferences (S) = 2πr
ΔSS×100=Δrr×100=4%
EXAMPLE 23
Percentage error in measuring the radius and mass of a solid sphere are 2 % & 1 % respectively. The error in measurement of moment of inertia about to its diameter is :-
I=2/5MR2
ΔII=ΔMM+2ΔRR
ΔII×100=1%+2×2%=5%
EXAMPLE 23
Percentage error in measuring the radius and mass of a solid sphere are 2 % & 1 % respectively. The error in measurement of moment of inertia about to its diameter is :-
I=2/5MR2
ΔII=ΔMM+2ΔRR
ΔII×100=1%+2×2%=5%
EXAMPLE 24
The heat generated in a circuit is dependent upon the resistance, current and time for which the current is flown. If the error in measuring the above are 1%, 2% and 1% respectively, then maximum error in measuring the heat is
H= I2 Rt
⇒ΔHH×100=2ΔII×100+ΔRR×100+Δtt×100
=2(2%)+1%+1%=6%
EXAMPLE 24
The heat generated in a circuit is dependent upon the resistance, current and time for which the current is flown. If the error in measuring the above are 1%, 2% and 1% respectively, then maximum error in measuring the heat is
H= I2 Rt
⇒ΔHH×100=2ΔII×100+ΔRR×100+Δtt×100
=2(2%)+1%+1%=6%
EXAMPLE 25
The percentage errors in the measurement of mass and speed are 2%and3% , respectively . How much will be the maximum error in the estimation of KE obtained by measuring mass and speed?
KE=12mv2
ΔKEKE=Δmm+2Δvv
ΔKEKE×100=2+2×3=8%
EXAMPLE 25
The percentage errors in the measurement of mass and speed are 2%and3% , respectively . How much will be the maximum error in the estimation of KE obtained by measuring mass and speed?
KE=12mv2
ΔKEKE=Δmm+2Δvv
ΔKEKE×100=2+2×3=8%
VERNIER CALIPER
Vernier caliper ek device jo kisi small round shape ke object (spherical and cylindrical) ke inner and outer diameter ya kisi small linear object ke dimension ko measure karne ke liye use kiya jata hai.
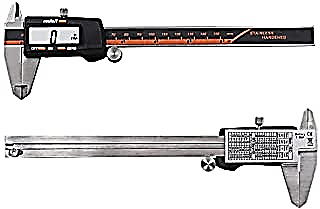
“A measuring device that is used for the measurement of linear dimensions. It is also used for the measurement of diameters of round objects with the help of the measuring jaws.”
Principle of a vernier
The vernier scale uses the alignment of line segments displaced by a small amount to make fine measurements.
Object ke diameter ya linear dimention ko measure karne ke liye isme jaws hote hai, niche figure me aap vernier calipers dekh skte hai.
1631 me Pierre vernier naam ke scientist ne is instrument ki khoj ki aur inhi ke naam pr is device ka naam vernier calipers rakha gaya. Vernier callipers ke use se hume accurate and precise measurement milta hai.
Niche diye gaye figure me aap vernier callipers dekh sakte hai. Iske do main scale hote hai.. Ek scale dusra vernier scale. Ye scales bahut hi chhote-chhote small divisions me divided hai. In dono scales ke perpendicular do jaws hai. Aapko left side uper-niche jaws dikh rahe hai. Upper jaws kisi round shape object ke outer dimention ko measure karta hai jabki lower jaws kisi round object ke inner dimesion ko measure karta hai.
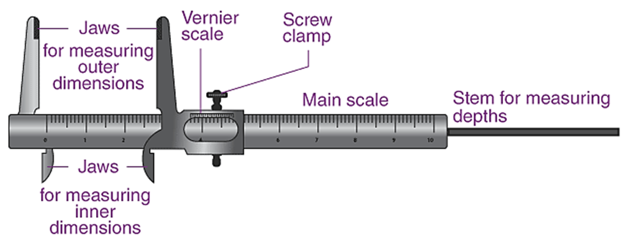
Jab hum iske dono jaws ko pura jod dete hai to dono scale ke zeros aapas me coincide ho jate hai.
Least Count of Vernier Calliper
Wo small possible distance jo measure kiya ja sakta hai use least count (LC) kahte hai. Ye distance main scale division (MSD) and vernier calipers scale division (VSD) ke bich ka difference hota hai, ise vernier constant (VC) bhi kahte hai.VC=1MSD–1VSD
n(V.S.D)=(n−1)M.S.D
Ager VS ke n divisions hai jo main scale ke n−1 divisions se coinside hote hai to vernier calipers ka least count (LC) hoga...
Least count of Vernier’s Calliper =magnitude of the smallest division on the main scale /Total number of small divisions on the vernier scale
LC=(1−n−1n)MSD
Corrected Diameter = Mean Observed Diameter – Zero Error
What is Zero Error?
“Zero error is defined as the condition in which the measuring device registers a reading when there should not be any reading.”
The zero error of vernier calliper is calculated as:
Actual reading = Main scale + Vernier scale – (Zero error)
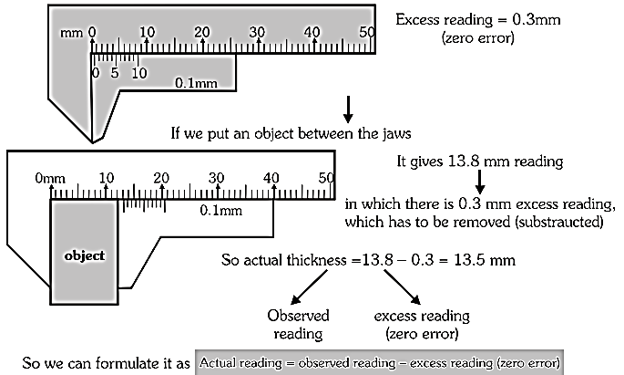
There are two types of zero error:
Positive zero error: When the jaws of the vernier calliper are closed and the reading is positive and away from the actual reading of 0.00 mm. For instance, if the reading is 0.08 mm, then the zero error is +0.08 mm.
Negative zero error: When the jaws of the vernier calliper are closed and the reading is negative and away from the actual reading of 0.00 mm. For instance, if the reading is 0.10 mm, then the zero error is -0.10 mm.
ZERO CORRECTION
Zero correction is invert of zero error.
Actual reading = observed reading - excess reading (zero error)
= observed reading + zero correction
zero correction = - zero error
Applications of Vernier Callipers
* Medical usages* Science labs
* Industries such as steel and aerospace
* Educational sectors
VERNIER CALIPER
Vernier caliper ek device jo kisi small round shape ke object (spherical and cylindrical) ke inner and outer diameter ya kisi small linear object ke dimension ko measure karne ke liye use kiya jata hai.

“A measuring device that is used for the measurement of linear dimensions. It is also used for the measurement of diameters of round objects with the help of the measuring jaws.”
Principle of a vernier
The vernier scale uses the alignment of line segments displaced by a small amount to make fine measurements.
Object ke diameter ya linear dimention ko measure karne ke liye isme jaws hote hai, niche figure me aap vernier calipers dekh skte hai.
1631 me Pierre vernier naam ke scientist ne is instrument ki khoj ki aur inhi ke naam pr is device ka naam vernier calipers rakha gaya. Vernier callipers ke use se hume accurate and precise measurement milta hai.
Niche diye gaye figure me aap vernier callipers dekh sakte hai. Iske do main scale hote hai.. Ek scale dusra vernier scale. Ye scales bahut hi chhote-chhote small divisions me divided hai. In dono scales ke perpendicular do jaws hai. Aapko left side uper-niche jaws dikh rahe hai. Upper jaws kisi round shape object ke outer dimention ko measure karta hai jabki lower jaws kisi round object ke inner dimesion ko measure karta hai.

Jab hum iske dono jaws ko pura jod dete hai to dono scale ke zeros aapas me coincide ho jate hai.
Least Count of Vernier Calliper
Wo small possible distance jo measure kiya ja sakta hai use least count (LC) kahte hai. Ye distance main scale division (MSD) and vernier calipers scale division (VSD) ke bich ka difference hota hai, ise vernier constant (VC) bhi kahte hai.VC=1MSD–1VSD
n(V.S.D)=(n−1)M.S.D
Ager VS ke n divisions hai jo main scale ke n−1 divisions se coinside hote hai to vernier calipers ka least count (LC) hoga...
Least count of Vernier’s Calliper =magnitude of the smallest division on the main scale /Total number of small divisions on the vernier scale
LC=(1−n−1n)MSD
Corrected Diameter = Mean Observed Diameter – Zero Error
What is Zero Error?
“Zero error is defined as the condition in which the measuring device registers a reading when there should not be any reading.”
The zero error of vernier calliper is calculated as:
Actual reading = Main scale + Vernier scale – (Zero error)

There are two types of zero error:
Positive zero error: When the jaws of the vernier calliper are closed and the reading is positive and away from the actual reading of 0.00 mm. For instance, if the reading is 0.08 mm, then the zero error is +0.08 mm.
Negative zero error: When the jaws of the vernier calliper are closed and the reading is negative and away from the actual reading of 0.00 mm. For instance, if the reading is 0.10 mm, then the zero error is -0.10 mm.
ZERO CORRECTION
Zero correction is invert of zero error.
Actual reading = observed reading - excess reading (zero error)
= observed reading + zero correction
zero correction = - zero error
Applications of Vernier Callipers
* Medical usages* Science labs
* Industries such as steel and aerospace
* Educational sectors
EXAMPLE 26
The zero error of the vernier calipers shown in the figure is _________. 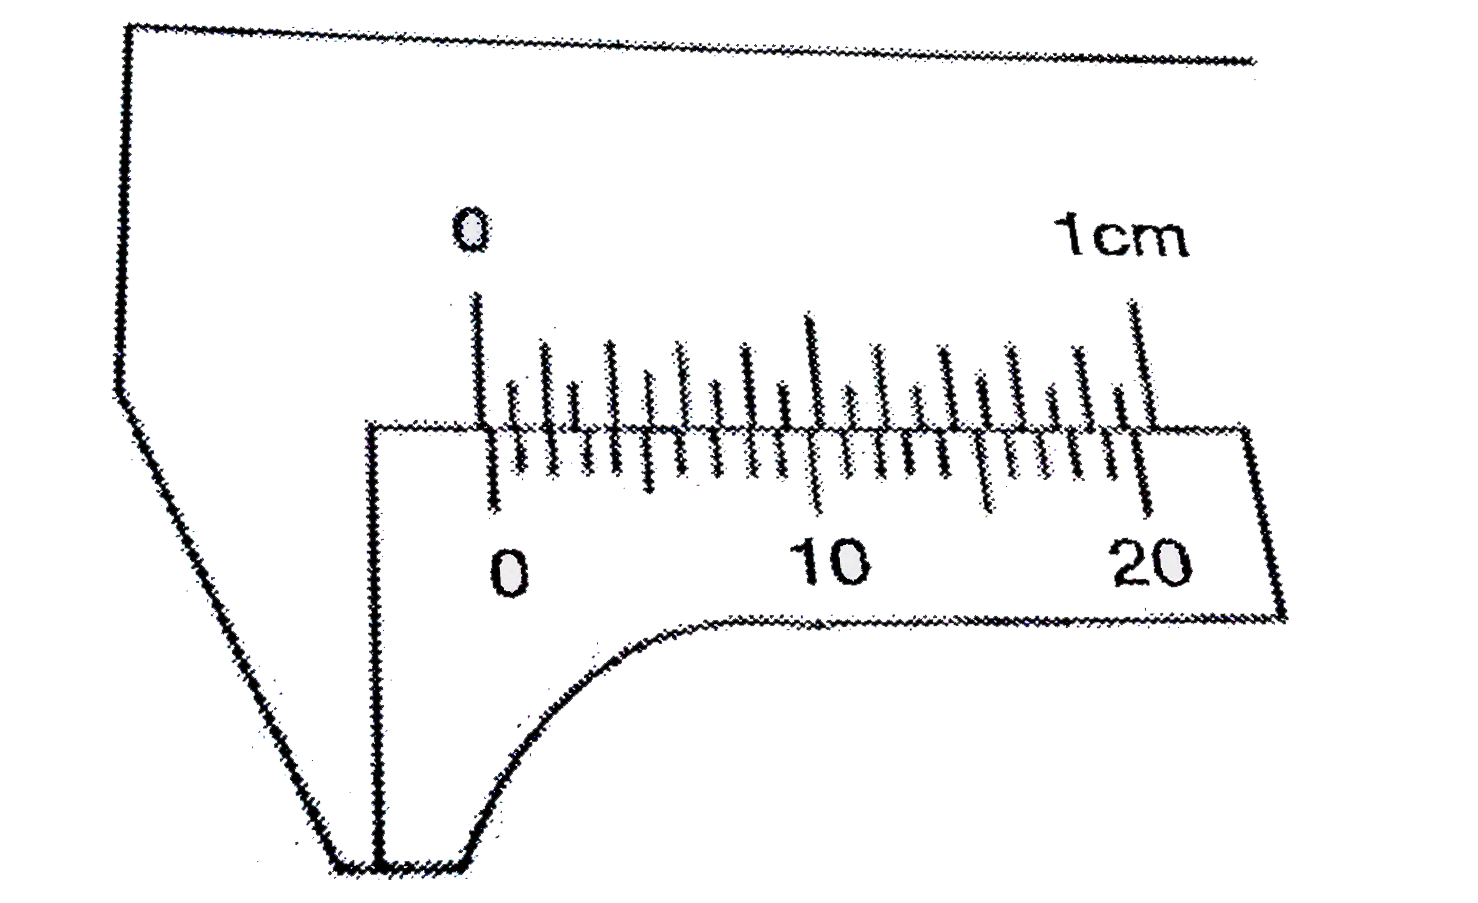
A. +100μm
B. +0.01cm
C. 0.1 mm
D. All of the above
VCD for zero error = 4
Since the zero of the vernier scale is to the right of the zero of the main scale, the error is positive.
∴zero error=+n×L.C
=+4×0.025mm
=+0.100mm
=+0.01cm=+100μm
EXAMPLE 26
The zero error of the vernier calipers shown in the figure is _________. 
A. +100μm
B. +0.01cm
C. 0.1 mm
D. All of the above
VCD for zero error = 4
Since the zero of the vernier scale is to the right of the zero of the main scale, the error is positive.
∴zero error=+n×L.C
=+4×0.025mm
=+0.100mm
=+0.01cm=+100μm
EXAMPLE 27
When the two jaws of a vernier callipers are in touch, zero of vernier scale lies to the right of zero of main scale and coinciding with vernier division 3. If vernier constant is 0.1mm, the zero correction is
A. −0.03cm
B. +0.03cm
C. −0.03mm
D. +0.03mm
Error is positive
∴ Zero correction is negative
EXAMPLE 28
In a vernier callipers having 10 Vsd the vernier constant is 0.1 mm When the jaws are closed zero of varnier lies to the left of zero of main and 7th Vsd coincides with scale division when a cylinder is placed between the jaws the main scale reading was 7.7 cm and vernier scale read 8 division What is the diameter of the cylinder ?
A. 78.1mm
B. 77.5mm
C. 77.8mm
D. 78.5mm
zero error =−(10−7)×0.1=−0.3 mm
diameter=77.0+8×0.1−(0.3)
=78.1 mm
SCREW GAUGE
Exact measurements are a necessity in the scientific field of work. Many types of people can come across a screw gauge in their day to day life and have no idea how to handle it. For measuring a spherical or a cylindrical object screw gauge is the best instrument that can be used. An extremely fine-tuned screw gauge can be a bit difficult for untrained hands to use and thus this post aims to achieve the objective of making anyone and everyone aware of the basics of handling a screw gauge.
Least Count of Screw Gauge
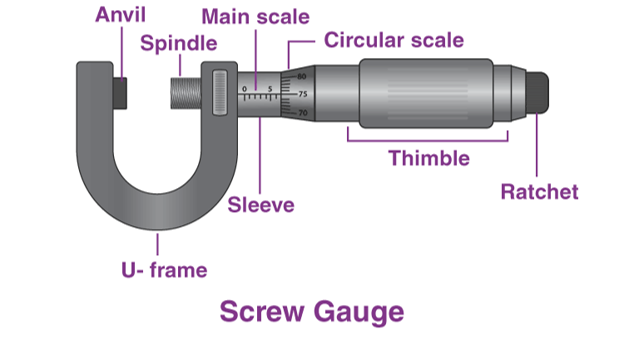
L.C. = Pitch / Total no. of divisions on the circular scale
where pitch is defined as the distance moved by the screw head when the circular scale is given one complete rotation. i.e.
Pitch = Distance moved by the screw on the linear scale / No.of full rotations given
Note : With the decrease in the least count of the measuring instrument, the accuracy of the measurement increases and the error in the measurement decreases.
• Precision of a measurement
The precision of a measurement is determined by the least count of a measuring instrument. The smaller is the least count larger is the precision of the measurement.
• Accuracy of a measurement
Accuracy of an instrument represents the closeness of the measured value to actual value.
• Zero Error
If there is no object between the jaws (i.e. jaws are in contact), the screw gauge should give zero reading. But due to extra material on jaws, even if there is no object, it gives some excess reading. This excess reading is called zero error.
* All the instruments utilizing threads have back-lash error which belongs to the random category.
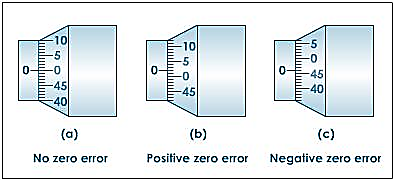
Zero correction
Zero correction is invert of zero error :
Zero correction = – (zero error) Actual reading = observed reading – zero error = observed reading + zero correction
SCREW GAUGE
Exact measurements are a necessity in the scientific field of work. Many types of people can come across a screw gauge in their day to day life and have no idea how to handle it. For measuring a spherical or a cylindrical object screw gauge is the best instrument that can be used. An extremely fine-tuned screw gauge can be a bit difficult for untrained hands to use and thus this post aims to achieve the objective of making anyone and everyone aware of the basics of handling a screw gauge.
Least Count of Screw Gauge

L.C. = Pitch / Total no. of divisions on the circular scale
where pitch is defined as the distance moved by the screw head when the circular scale is given one complete rotation. i.e.
Pitch = Distance moved by the screw on the linear scale / No.of full rotations given
Note : With the decrease in the least count of the measuring instrument, the accuracy of the measurement increases and the error in the measurement decreases.
• Precision of a measurement
The precision of a measurement is determined by the least count of a measuring instrument. The smaller is the least count larger is the precision of the measurement.
• Accuracy of a measurement
Accuracy of an instrument represents the closeness of the measured value to actual value.
• Zero Error
If there is no object between the jaws (i.e. jaws are in contact), the screw gauge should give zero reading. But due to extra material on jaws, even if there is no object, it gives some excess reading. This excess reading is called zero error.
* All the instruments utilizing threads have back-lash error which belongs to the random category.

Zero correction
Zero correction is invert of zero error :
Zero correction = – (zero error) Actual reading = observed reading – zero error = observed reading + zero correction
EXAMPLE 36
Thickness of a pencil measured by using a screw gauge (least count.001 cm) comes out to be 0.802 cm .The percentage error in the measurement is
A. 0.125%
B. 2.43%
C. 4.12%
D. 2.14%
Thickness t=0.802cm
Least count=0.001 cm
now error in measuring t=(0.802+-0.001)
percentage error=0.001/0.802×100%
=0.125%
EXAMPLE 37
The pitch of a screw gauge is 1mm and its cap is divided into 100 divisions. When this screw gauge is used to measure the diameter of a wire, then main scale reading is 2mm and 58th division of circular scale coincides with the main scale. There is no zero error in the screw gage. Then the diameter of the wire is
A. 2.38mm
B. 2.48mm
C. 2.58mm
D. 3.58mm
The pitch of the screw gauge, P=1mm
Lesat count, L.C.=PN=1mm100=0.01mm
∴ Diameter of the wire, d=2mm+58×L.C.
=2mm+58×0.01mm
=2.58mm
EXAMPLE 38
Using a screw gauge the thickness of a wire was measured as 5 mm. Calculate (i) the fractional error (ii) the percentage error.
Given data:
Thickness of wire (t)=5 mm
Accuracy Δt=0.01mm
(i)Fractional error =δt=Δtt=0.015=0.002
(ii) Percentage error =δt=Δtt×100%
=0.002×100%=0.02%
EXAMPLE 38
Using a screw gauge the thickness of a wire was measured as 5 mm. Calculate (i) the fractional error (ii) the percentage error.
Given data:
Thickness of wire (t)=5 mm
Accuracy Δt=0.01mm
(i)Fractional error =δt=Δtt=0.015=0.002
(ii) Percentage error =δt=Δtt×100%
=0.002×100%=0.02%
DEFINITIONS
Accuracy: The degree to which a measured value agrees with an accepted reference value for that measurement.
Base quantity: Physical quantity chosen by convention and practical considerations such that all other physical quantities can be expressed as algebraic combinations of them.
Base unit: Standard for expressing the measurement of a base quantity within a particular system of units; defined by a particular procedure used to measure the corresponding base quantity
Conversion factor: A ratio that expresses how many of one unit are equal to another unit.
Derived quantity: Physical quantity defined using algebraic combinations of base quantities.
Derived units:
Units that can be calculated using algebraic combinations of the fundamental units.
Dimension:
Expression of the dependence of a physical quantity on the base quantities as a product of powers of symbols representing the base quantities.
Dimensionally consistent:
Equation in which every term has the same dimensions and the arguments of any mathematical functions appearing in the equation are dimensionless.
Dimensionless:
In dimensional analysis, a dimensionless quantity is a quantity to which no physical dimension is assigned, also known as a bare, pure, or scalar quantity or a quantity of dimension one, with a corresponding unit of measurement in the SI of the unit one (or 1).
Discrepancy:
The difference between the measured value and a given standard or expected value.
English units:
System of measurement used in the United States; includes units of measure such as feet, gallons, and pounds
Estimation:
Using prior experience and sound physical reasoning to arrive at a rough idea of a quantity’s value; sometimes called an “order-of-magnitude approximation,” a “guesstimate,” a “back-of-the-envelope calculation”, or a “Fermi calculation”
Kilogram:
SI unit for mass, abbreviated kg.
Law:
Description, using concise language or a mathematical formula, of a generalized pattern in nature supported by scientific evidence and repeated experiments.
Meter:
SI unit for length, abbreviated m
Method of adding percents:
The percent uncertainty in a quantity calculated by multiplication or division is the sum of the percent uncertainties in the items used to make the calculation.
Metric system:
System in which values can be calculated in factors of 10.
Model:
Representation of something often too difficult (or impossible) to display directly.
Order of magnitude:
The size of a quantity as it relates to a power of 10.
Percent uncertainty:
The ratio of the uncertainty of a measurement to the measured value, expressed as a percentage.
Physical quantity:
Characteristic or property of an object that can be measured or calculated from other measurements.
Physics:
Science concerned with describing the interactions of energy, matter, space, and time; especially interested in what fundamental mechanisms underlie every phenomenon.
Precision:
The degree to which repeated measurements agree with each other.
Second:
The SI unit for time, abbreviated s
SI units:
the international system of units that scientists in most countries have agreed to use; includes units such as meters, liters, and grams
Significant figures:
Used to express the precision of a measuring tool used to measure a value.
Theory:
Testable explanation for patterns in nature supported by scientific evidence and verified multiple times by various groups of researchers.
Uncertainty:
A quantitative measure of how much measured values deviate from one another.
Units:
Standards used for expressing and comparing measurements
SUMMARY
1 The Scope and Scale of Physics
* Physics is about trying to find the simple laws that describe all natural phenomena.
* Physics operates on a vast range of scales of length, mass, and time. Scientists use the concept of the order of magnitude of a number to track which phenomena occur on which scales. They also use orders of magnitude to compare the various scales.
* Scientists attempt to describe the world by formulating models, theories, and laws.
2 Units and Standards
* Systems of units are built up from a small number of base units, which are defined by accurate and precise measurements of conventionally chosen base quantities. Other units are then derived as algebraic combinations of the base units.
* Two commonly used systems of units are English units and SI units. All scientists and most of the other people in the world use SI, whereas nonscientists in the United States still tend to use English units.
* The SI base units of length, mass, and time are the meter (m), kilogram (kg), and second (s), respectively.
* SI units are a metric system of units, meaning values can be calculated by factors of 10. Metric prefixes may be used with metric units to scale the base units to sizes appropriate for almost any application.
3. Unit Conversion
* To convert a quantity from one unit to another, multiply by conversion factors in such a way that you cancel the units you want to get rid of and introduce the units you want to end up with.
* Be careful with areas and volumes. Units obey the rules of algebra so, for example, if a unit is squared we need two factors to cancel it.
4. Dimensional Analysis
* The dimension of a physical quantity is just an expression of the base quantities from which it is derived.
* All equations expressing physical laws or principles must be dimensionally consistent. This fact can be used as an aid in remembering physical laws, as a way to check whether claimed relationships between physical quantities are possible, and even to derive new physical laws.
5. Estimates and Fermi Calculations
An estimate is a rough educated guess at the value of a physical quantity based on prior experience and sound physical reasoning.
6. Significant Figures
* Accuracy of a measured value refers to how close a measurement is to an accepted reference value. The discrepancy in a measurement is the amount by which the measurement result differs from this value.
* Precision of measured values refers to how close the agreement is between repeated measurements. The uncertainty of a measurement is a quantification of this.
* The precision of a measuring tool is related to the size of its measurement increments. The smaller the measurement increment, the more precise the tool.
* Significant figures express the precision of a measuring tool.
* When multiplying or dividing measured values, the final answer can contain only as many significant figures as the least-precise value.
When adding or subtracting measured values, the final answer cannot contain more decimal places than the least-precise value.
7. Solving Problems in Physics
The three stages of the process for solving physics problems used in this book are as follows:
* Strategy: Determine which physical principles are involved and develop a strategy for using them to solve the problem.
* Solution: Do the math necessary to obtain a numerical solution complete with units.
* Significance: Check the solution to make sure it makes sense (correct units, reasonable magnitude and sign) and assess its significance.